Wednesday, February 29, 2012
Chili's Copycat Queso Dip
Sunday was the Daytona 500. Or rather, it was supposed to be the day of the Daytona 500. As it turned out, the race was completed about 1am on Tuesday, complete with a crazy jet fuel fire (Did you know that you can put out a jet fuel fire with Tide? Pin that one to Pinterest.)
So in preparation for what my husband refers to as the "Super Bowl of Racing", I set out to make a few fun appetizers for Sunday afternoon. Another Pinterest find, this recipe is by far one of the simplest I've ever tackled and will probably become a staple on Mexican nights.
Added bonus: I finally got to use the little purple Crock Pot I bought at Christmas!
Ingredients
2 cans Hormel Chili, No Beans
1.5 lb. Velveeta, cubed
1 tsp pepper
salsa, to taste (I used about 1/4 cup)
Tortilla Chips (Unless you just want to eat it out of the Crock Pot with a spoon :)
Directions
Combine all ingredients in Crock Pot. Set Crock Pot to low. Heat two hours, stirring occasionally. Enjoy!
Thursday, February 16, 2012
Week 2 Recipe Winner: Crockpot Meatballs
This week's recipe contest winner was another huge hit with my family and I'm excited to share it! I've been working like crazy at my (real) job, with not a lot of time for much else- so a Crock Pot recipe was just perfect for this week.
Submitted by Mandy Smith, via her mom, Pam Smith, this creamy meatball recipe is quick, simple and very tasty-I had to watch to keep my husband out of the Crockpot while these were cooking! This recipe made a lot - enough for two meals, with leftovers for lunches and lots of pilfering directly from the Crockpot :)
Ingredients:
1 large green pepper
1 large onion
1 stick of butter
2 small cans Campbell's Tomato Soup
1 can Campbell's Cream of Mushroom soup
1 can evaporated milk
Add 4 bags of Armour original meatballs (each bag is 28)
Directions:
Dice onions and peppers and cook with butter in saucepan until onions are translucent and peppers are soft. Add onion/pepper mixture, soups, and evaporated milk to the Crockpot and stir. Add meatballs and stir to combine. Cook in Crockpot at least 4 hours on High or 6 hours on low- stirring once per hour to avoid burning. Enjoy!
Wednesday, February 15, 2012
Grilled Cheese with Balsamic and Onion Pot Roast
Have leftover pot roast? This sandwich is by far one of my favorite uses for leftovers, as well as one of my favorite grilled cheese sandwiches.
Ingredients:
Leftover Pot Roast, enough for two sandwiches
Four slices of bread
4-6 slices of cheese
Instructions:
Warm a pan, and add pot roast - just to warm it up a bit.
Butter two slices of bread.
Heat a separate pan over medium heat, and place one slice of bread buttered side down.
Immediately add 1-2 slices of cheese. Top with warmed pot roast, and 1-2 more slices of cheese.
Place the other piece of bread on top (butter side up).
After about 4 minutes - check the bottom piece of bread by lifting the corner with a spatula. If browned to your liking, carefully flip and grill the other side, about 4-5 minutes. (You may want to cover the pan to help promote cheese melting.)
Enjoy!
Balsamic and Onion Pot Roast
During the winter months a lot of meals include roasts-and this is one of my favorite recipes for pot roast. Stay tuned for my next recipe to find out what to do with the leftovers!
Ingredients:
3-4 pound boneless chuck roast
2 Tbsp Steak Rub (I used Montreal Steak)
2 Tbsp olive oil
2 large onions, sliced thickly
1 cup beef stock, reduced to 1/2 cup
1/2 cup balsamic vinegar
1/2 cup tomato sauce
Directions:
Trim as much fat as you can from the roast. Rub meat well with steak seasoning. Heat a heavy pan with small amount of olive oil and brown roast well on both sides.
While the roast browns, place the beef stock in a saucepan, bring to a boil and cook until reduced to 1/2 cup. Let cool slightly, then mix in balsamic vinegar and tomato sauce.
Deglaze the pan you browned the roast in with 1/4 cup water and add to sauce mixture.
Peel onions and cut into thick slices. Place onions in bottom of Crockpot. Place roast on top of the onions and pour beef stock sauce over. Set Crockpot to low and cook 6-8 hours, until beef is tender. The meat might be partly submerged in liquid after this much time.
Remove meat from crockpot and cover with foil to keep warm. Drain liquid from Crockpot and remove as much of the fat as you can with fat separator or skimmer. Cook down liquid by about 1/3, and serve sauce with meat and onions.
Recipe slightly adapted from Kalyn's Kitchen
Individual 7 Layer Dips
This is a quick, fun recipe for any occasion! I made these for my brother's Super Bowl party, and they were a big hit. All the flavor of 7 layer dip with less mess, and no double dipping :)
Ingredients:
1 (16 ounce) can refried beans (I used spicy refried beans)
1 (1 ounce) package taco seasoning
1 cup guacamole (I used 2 avocados and a packet of spicy guacamole mix)
1 (8 ounce) container sour cream
1 cup chunky salsa
1 cup shredded Mexican blend cheese
2 Roma tomatoes, diced
1/2 bunch of green onions, sliced
9 ounce plastic tumblers
tortilla chips
Directions:
In a small bowl mix taco seasoning with refried beans. Some people prefer to mix their taco seasoning with the sour cream layer but I wanted a bright white layer so I did it with the beans.
Here's how the layers are assembled:
Layer 1: beans and taco seasoning
Layer 2: sour cream
Layer 3: guacamole
Layer 4: salsa
Layer 5: cheese
Layer 6: tomatoes
Layer 7: green onions
In each plastic glass, layer about 2 Tbsp of the beans, followed by 2 Tbsp of sour cream, 2 Tbsp of guacamole, 2 Tbsp of salsa or pico de gallo, 2 Tbsp of cheese, and 2 tbsp of salsa. Then top with about 1-2 teaspoons of tomatoes and green onion (If you're making these ahead of time, wait to add these toppings until shortly before serving).
Store in the refrigerator until serving and serve with chips. Makes 8 individual dips.
Monday, February 6, 2012
Week 1 Recipe Winner: Teriyaki Chicken Thighs
I was super excited to make the Teriyaki Chicken Thighs recipe submitted by Elise Walter for our first week's recipe contest!
Like a lot of people, when cooking chicken at home, I almost always reach for chicken breast. I didn't even know what I was missing by overlooking chicken thighs-until I tasted this. The meat was tender, juicy and sweet, made even more amazing with the addition of a homemade teriyaki sauce.
We love teriyaki, and for years I've used a bottled sauce, with the intention of learning to make a homemade sauce...someday. Last Wednesday was that day!
But it gets better! The total cost for this recipe was only about $7. Chicken thighs are generally much more affordable than the chicken breasts and I purchased two packages for a total of $5. Easy, delicious, and inexpensive-what could be better?
I did alter the original Cook's Illustrated recipe slightly-for a few reasons. First, I didn't have mirin that the original recipe called for-that would have cost another $5-so I substituted rice vinegar. I also substituted 1/4 tsp ground ginger for 1/2 tsp fresh ginger. And I doubled the original sauce recipe (figures shown below are the doubled amounts) as we like our chicken extra saucy.
Additionally, after broiling the meat for the recommended 8-14 minutes, the chicken was still very pink inside. I turned the stove down to 350, and baked the chicken for an additional 15 minutes to cook through.
At first I was a little nervous about de-boning the thighs, but it turned out to be pretty simple. I'm sure you could also cook it bone-in to save time, just be sure to alter the cooking time accordingly.
Overall, an awesome recipe-and one that we will make again, as soon as chicken thighs are on sale. This may also become my new go-to teriyaki sauce recipe! :)
Ingredients
8 bone-in, skin-on chicken thighs (see instructions on prep below)
table salt and ground black pepper
1 cup soy sauce
1 cup sugar
½ tsp grated fresh ginger
2 cloves garlic, minced (1 tsp)
4 tbsp rice vinegar
1 tsp cornstarch
Instructions
Position oven rack about 8 inches from heat source; heat broiler.
CHICKEN PREP INSTRUCTIONS:
Remove bone from thighs. Take your kitchen shears and cut along the bone, then work around it, leaving the thigh as intact as possible while extracting the bone. Trim excess fat. Leave skin on top of thigh, but trim any excess. Cut three diagonal slashes into the skin without piercing the meat. Tuck meat under skin and lightly flatten thigh to even thickness. Season chicken thighs with salt and pepper; set thighs skin side up on broiler pan (or foil-lined rimmed baking sheet fitted with flat wire rack), tucking exposed meat under skin and lightly flattening thighs to be of relatively even thickness.
Chicken should look like this for broiling:
Broil until skin is crisp and golden brown, 8 to 14 minutes, rotating pan halfway through cooking time for even browning.
Using a meat thermometer, check to see if thickest parts of thighs register 175 degrees on instant-read thermometer. If so, your chicken is done!
If not, turn oven off and allow it to cool for 5 minutes. Then reheat oven to 350.
Flip chicken skin-side down and bake for 12-20 minutes or until thickest parts of thighs register 175 degrees on instant-read thermometer.
Top of chicken after broiling:
While chicken cooks, combine soy sauce, sugar, ginger, and garlic in small saucepan; stir together rice vinegar and cornstarch in small bowl until no lumps remain, then stir vinegar mixture into saucepan. Bring sauce to boil over medium-high heat, stirring occasionally; reduce heat to medium-low and simmer, stirring occasionally, until sauce is reduced to 3/4 cup and forms syrupy glaze, about 4 minutes. Cover to keep warm.
Transfer chicken to cutting board; let rest 2 to 3 minutes. Cut meat crosswise into 1/2-inch- wide strips. Transfer chicken to serving platter; stir teriyaki sauce to recombine, then drizzle to taste over chicken. Serve immediately, passing remaining sauce separately.
Monday, January 30, 2012
Mom's Super Bowl Chili
I'm a huge sports fan. And by huge sports fan, I mean that I asked my husband the colors of the two teams playing in the Super Bowl so that I could make coordinating cupcakes.
I do love a great sporting event- if not for the entertainment factor. We're attending a Super Bowl party at my brother's house this weekend and I'm really looking forward to my mom's fabulous Chili. She serves it over rice, while I prefer to eat it plain and spiced up.
Ingredients:
2.5 lb. ground beef
1/2 fresh sweet red pepper, chopped
1/2 large onion, chopped
large can of tomato juice (64 oz)
1 large can whole tomatoes (or 1 quart-I used a quart of the tomatoes we canned last fall)
1 can Dark Red Kidney Beans
1 can Red Beans
1 can Black Beans
1 can corn (I used a 2 cup package of the corn off the cob we froze last fall)
1 tsp chili powder
salt and pepper to taste
1/4 cup jalapenos (optional)
Directions:
Brown ground beef in a skillet with chopped peppers and onions. Drain the fat.
Drain and rinse the Dark Red Kidney Beans, Red Beans, and Black Beans in a colander.
Add ground beef, pepper and onion mixture to a large soup pot. Add the drained, rinsed beans. Add the large can of tomato juice, then add a half a can of water to the pot.
Add the can of whole tomatoes to the pot, breaking them up with your fingers into bite-sized chunks. Finally, add the corn, chili powder, salt, pepper and jalapenos and stir to combine.
Heat the chili through, then serve with rice or plain with hot sauce and crackers. Enjoy!
Tuesday, January 24, 2012
This Week for Dinner: January 23 - 29
This week's menu is probably the favorite menu that I've put together. Mostly Pinterest-inspired, with a few budget-conscious picks, I'm super excited to try these five new recipes this week.
Next week, I'll begin going through submissions for the recipe contest-please be sure to submit your favorite recipe! I'll be making one reader recipe each week for the next eight weeks, with a giveaway for the best recipe on March 31.
I'm also excited to share that I'm working on a re-design for the blog-I'm currently in the process of getting quotes to give the blog a new look! I'm hoping to roll out the new design in April, and in the process I'll be adding more functionality, including searching recipes by ingredient. Stay tuned! :)
Stromboli with Salami, Capicola and Provolone
Stromboli just makes me happy. Italian meats and cheeses, stuffed in a savory crust, with marinara dipping sauce-what's not to love?
http://www.blissfullydelicious.com/2012/01/stromboli-with-salami-capocollo-and-provolone
Panko Crusted Salmon with Bacon Wrapped Green Beans
Salmon is my family's favorite fish. Versatile and yummy, I'm always looking for new ways to prepare a nice piece of salmon. I was so excited to run across this recipe on Pinterest, and even more excited to taste what I'm sure will be an amazing dish!
http://annies-eats.com/2011/04/13/panko-crusted-salmon
And how cute are these? I picked up some fresh green beans the other day-we're beginning to grow weary of the canned version-and I'm hoping for a nice taste of summer in the middle of winter.
http://www.justcookalready.com/2010/11/bacon-wrapped-green-beans.html
Loaded Baked Potato Grilled Cheese with Tomato Basil Soup
I've been on a giant grilled cheese kick this winter. There is so much inspiration out there on creative grilled cheese-this might just be my favorite.
http://bsinthekitchen.com/baked-potato-grilled-cheese/
http://plumdeliciousrecipes.blogspot.com/2011/08/recipe-file-super-simple-tomato-basil.html
Sweet and Spicy Chicken Drumsticks with Onion Potato Gratin
I don't make Chicken Drumsticks very often, but this recipe caught my eye- and you can't beat the price!
http://www.eatlivetravelwrite.com/2012/01/devilled-drumsticks-for-the-gojee-virtual-pot-luck/
http://simplyrecipes.com/recipes/onion_potato_gratin/
Coconut Chicken with Sweet Chili Dipping Sauce ($1.15 per serving!)
Another great budget conscious option, this coconut chicken is a take on one of my restaurant favorites, Red Lobster's Coconut Shrimp. Very excited to see how this translates using chicken!
http://budgetbytes.blogspot.com/2010/01/coconut-chicken-w-sweet-chili-sauce-691.html
Have a great week, and Happy Cooking!
Next week, I'll begin going through submissions for the recipe contest-please be sure to submit your favorite recipe! I'll be making one reader recipe each week for the next eight weeks, with a giveaway for the best recipe on March 31.
I'm also excited to share that I'm working on a re-design for the blog-I'm currently in the process of getting quotes to give the blog a new look! I'm hoping to roll out the new design in April, and in the process I'll be adding more functionality, including searching recipes by ingredient. Stay tuned! :)
Stromboli with Salami, Capicola and Provolone
Stromboli just makes me happy. Italian meats and cheeses, stuffed in a savory crust, with marinara dipping sauce-what's not to love?
http://www.blissfullydelicious.com/2012/01/stromboli-with-salami-capocollo-and-provolone
Panko Crusted Salmon with Bacon Wrapped Green Beans
Salmon is my family's favorite fish. Versatile and yummy, I'm always looking for new ways to prepare a nice piece of salmon. I was so excited to run across this recipe on Pinterest, and even more excited to taste what I'm sure will be an amazing dish!
http://annies-eats.com/2011/04/13/panko-crusted-salmon
And how cute are these? I picked up some fresh green beans the other day-we're beginning to grow weary of the canned version-and I'm hoping for a nice taste of summer in the middle of winter.
http://www.justcookalready.com/2010/11/bacon-wrapped-green-beans.html
Loaded Baked Potato Grilled Cheese with Tomato Basil Soup
I've been on a giant grilled cheese kick this winter. There is so much inspiration out there on creative grilled cheese-this might just be my favorite.
http://bsinthekitchen.com/baked-potato-grilled-cheese/
http://plumdeliciousrecipes.blogspot.com/2011/08/recipe-file-super-simple-tomato-basil.html
Sweet and Spicy Chicken Drumsticks with Onion Potato Gratin
I don't make Chicken Drumsticks very often, but this recipe caught my eye- and you can't beat the price!
http://www.eatlivetravelwrite.com/2012/01/devilled-drumsticks-for-the-gojee-virtual-pot-luck/
http://simplyrecipes.com/recipes/onion_potato_gratin/
Coconut Chicken with Sweet Chili Dipping Sauce ($1.15 per serving!)
Another great budget conscious option, this coconut chicken is a take on one of my restaurant favorites, Red Lobster's Coconut Shrimp. Very excited to see how this translates using chicken!
http://budgetbytes.blogspot.com/2010/01/coconut-chicken-w-sweet-chili-sauce-691.html
Have a great week, and Happy Cooking!
Monday, January 16, 2012
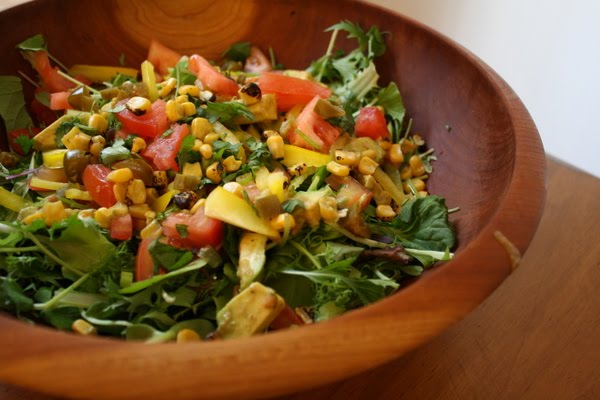
Southwest Salad

Ingredients
3-4 cups fresh greens
1/2 cup corn (frozen is fine, just defrost)
2 scallions, light green parts only, chopped
1/2 avocado
1 red or yellow pepper, cut into matchsticks
3 slices jalepeño from a can, diced
1/2 tomato, diced, or 1/2 cup cherry tomatoes, halved
2 tablespoons fresh cilantro, diced
1/2 recipe cornbread (see below), or 3 thick slices of store-bought cornbread
2 slices jalepeño jack cheese
Tomato-cilantro dressing (see below)
Directions:
Make the dressing and the cornmeal croutons.
Cut the avocados into large chunks and toss carefully with a few spoonfuls of the dressing to prevent browning.
Arrange the greens in a bowl with the corn, scallions, avocado, pepper, jalepeño, tomato, and cilantro artfully arranged on top. Add the warm or room-temperature croutons. Sprinkle with the dressing and toss just before serving.
For the croutons:
Cut the cornbread into 1-inch squares. If you have time, let them dry uncovered for about a day. Then preheat the oven to 375°F and toast for about 10 minutes. Dice the jack cheese and sprinkle over the croutons, pushing them into one corner of the pan, so not too much cheese misses the croutons. Return to the oven until the cheese is melted. Cool slightly, then add to the salad.
For the dressing:
In keeping with the spirit of “healthy choices,” this tasty dressing uses a light hand with the oil. Agave nectar is a sweetener that dissolves really well into liquids.
Ingredients
1/3 cup fresh cilantro
1/2 teaspoon salt
2 scallions, white and green parts, coarsely chopped
1 small clove garlic, minced
juice from 1/2 a lemon
dash cayenne pepper
3 tablespoons plain yogurt
1 tablespoon agave nectar of 1 tablespoon sugar dissolved in 1 tablespoon water
1/2 cup canned tomatoes, preferably fire roasted
1 tablespoon olive oil
In a blender or mini food processor, combine the cilantro, salt, scallions, lemon juice, cayenne, and yogurt. Blend until smooth, adding 3-4 tablespoons of water as needed. Put in the sweetener and the tomatoes, and continue to blend until very smooth (the mixture will turn a balsamic-vinaigrette-type brown). With the motor going, slowly add the olive oil. Taste for salt. Keep covered in the refrigerator until serving.
Tuna Salad Lettuce Wraps with Capers and Tomatoes

(Makes about 4 servings or 8 individual wraps; recipe adapted from The Ultimate Low-Carb Cookbook by Mary B. Johnson.)
Ingredients:
10-12 oz. good quality canned tuna (I used Tonno Genova Tuna Packed in Olive Oil.)
1/4 cup mayo or light mayo
1 tsp. Dijon mustard
1 T lemon juice
1/4 tsp. celery seed
1/4 tsp. Vege-Sal (or a slightly smaller amount of salt)
1/2 cup finely chopped celery
1 T capers, chopped
2 green onions, thinly sliced
8 large lettuce leaves, washed and dried (romaine, iceberg or butter lettuce will work for this)
1/2 cup chopped cherry tomatoes (optional)
Instructions
Drain tuna into a fine-mesh strainer and press down to drain out the oil (or water if you use water-packed tuna.) While tuna drains stir together the mayo, Dijon, lemon juice, celery seed, and Vege-Sal or salt.
Cut lettuce apart and pick out 8 large leaves. (I used two heads of romaine and kept the smaller inner leaves for salad greens.) Wash lettuce and spin dry in a salad spinner or dry with paper towels. Chop the celery and capers and thinly slice the green onions. Chop tomatoes if using.
When the tuna has drained, put it in a bowl (with a snap-tight lid if you won't be eating it all at once.) Stir in the dressing until it's well-distributed in the tuna, then mix in the celery, capers, and green onions.
Fill lettuce leaves with the tuna mixture, garnish with cherry tomatoes, and eat with your hands.
This kept well in the fridge for several days.
Subscribe to:
Posts (Atom)