Showing posts with label Healthy Eating. Show all posts

Monday, January 16, 2012

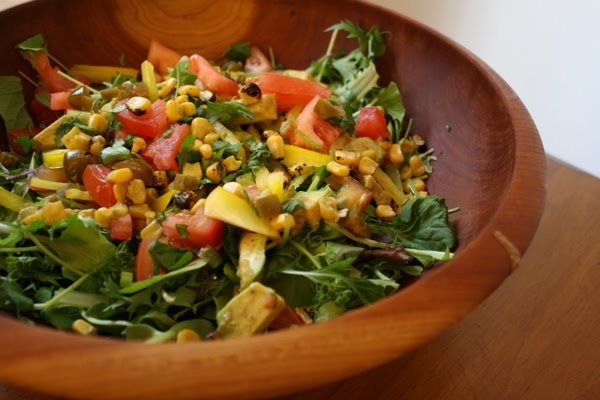
Southwest Salad


Ingredients

3-4 cups fresh greens
1/2 cup corn (frozen is fine, just defrost)
2 scallions, light green parts only, chopped
1/2 avocado
1 red or yellow pepper, cut into matchsticks
3 slices jalepeño from a can, diced
1/2 tomato, diced, or 1/2 cup cherry tomatoes, halved
2 tablespoons fresh cilantro, diced
1/2 recipe cornbread (see below), or 3 thick slices of store-bought cornbread
2 slices jalepeño jack cheese
Tomato-cilantro dressing (see below)

Directions:

Make the dressing and the cornmeal croutons.

Cut the avocados into large chunks and toss carefully with a few spoonfuls of the dressing to prevent browning.
Arrange the greens in a bowl with the corn, scallions, avocado, pepper, jalepeño, tomato, and cilantro artfully arranged on top. Add the warm or room-temperature croutons. Sprinkle with the dressing and toss just before serving.

For the croutons:
Cut the cornbread into 1-inch squares. If you have time, let them dry uncovered for about a day. Then preheat the oven to 375°F and toast for about 10 minutes. Dice the jack cheese and sprinkle over the croutons, pushing them into one corner of the pan, so not too much cheese misses the croutons. Return to the oven until the cheese is melted. Cool slightly, then add to the salad.

For the dressing:
In keeping with the spirit of “healthy choices,” this tasty dressing uses a light hand with the oil. Agave nectar is a sweetener that dissolves really well into liquids.

Ingredients
1/3 cup fresh cilantro
1/2 teaspoon salt
2 scallions, white and green parts, coarsely chopped
1 small clove garlic, minced
juice from 1/2 a lemon
dash cayenne pepper
3 tablespoons plain yogurt
1 tablespoon agave nectar of 1 tablespoon sugar dissolved in 1 tablespoon water
1/2 cup canned tomatoes, preferably fire roasted
1 tablespoon olive oil

In a blender or mini food processor, combine the cilantro, salt, scallions, lemon juice, cayenne, and yogurt. Blend until smooth, adding 3-4 tablespoons of water as needed. Put in the sweetener and the tomatoes, and continue to blend until very smooth (the mixture will turn a balsamic-vinaigrette-type brown). With the motor going, slowly add the olive oil. Taste for salt. Keep covered in the refrigerator until serving.

Tuna Salad Lettuce Wraps with Capers and Tomatoes


(Makes about 4 servings or 8 individual wraps; recipe adapted from The Ultimate Low-Carb Cookbook by Mary B. Johnson.)

Ingredients:
10-12 oz. good quality canned tuna (I used Tonno Genova Tuna Packed in Olive Oil.)
1/4 cup mayo or light mayo
1 tsp. Dijon mustard
1 T lemon juice
1/4 tsp. celery seed
1/4 tsp. Vege-Sal (or a slightly smaller amount of salt)
1/2 cup finely chopped celery
1 T capers, chopped
2 green onions, thinly sliced
8 large lettuce leaves, washed and dried (romaine, iceberg or butter lettuce will work for this)
1/2 cup chopped cherry tomatoes (optional)

Instructions
Drain tuna into a fine-mesh strainer and press down to drain out the oil (or water if you use water-packed tuna.) While tuna drains stir together the mayo, Dijon, lemon juice, celery seed, and Vege-Sal or salt.

Cut lettuce apart and pick out 8 large leaves. (I used two heads of romaine and kept the smaller inner leaves for salad greens.) Wash lettuce and spin dry in a salad spinner or dry with paper towels. Chop the celery and capers and thinly slice the green onions. Chop tomatoes if using.

When the tuna has drained, put it in a bowl (with a snap-tight lid if you won't be eating it all at once.) Stir in the dressing until it's well-distributed in the tuna, then mix in the celery, capers, and green onions.

Fill lettuce leaves with the tuna mixture, garnish with cherry tomatoes, and eat with your hands.

This kept well in the fridge for several days.

Saturday, July 30, 2011

Recipe File: Creole Salmon Cakes & my unrealistic expectations of Fish in a Can


I should start off by saying that this has been one of my favorite new recipes I’ve made this summer. The salmon cakes were amazing, and the spice was just right. My older stepson said that they were even better than my crab cakes (which, by the way, are also very good!)


However, I wasn’t prepared for what hit me when I opened my first-ever can of salmon. I neglected to note the use of “boneless, skinless” canned salmon on the recipe I used.


Having only purchased canned crabmeat, I was expecting something along the same lines. Not so. Bones, skin and the like peeked from the can, and I got nervous. As in “should I feed this to the cat” nervous. I called my mom, who between peals of laughter told me this was to be expected. Very carefully, I picked through the salmon,  taking out bones and skin, until I had a nice pile of (actually) pretty nice looking salmon. When that was complete, I knew that this would work.


Ingredients:


For the Cakes:


3 (6 oz) cans boneless, skinless pink salmon in water, drained


1/4 cup sliced green onions


1/4 cup mayonnaise


2 tbsp plain breadcrumbs


2 tsp Dijon mustard


1 tsp Emeril’s Bayou Blast Creole Seasoning


1/2 cup plain breadcrumbs


1 tbsp olive oil


For the Aioli:


2 tsp mayonnaise


2 tsp lemon juice


1 tsp minced garlic


Directions:


  • To prepare aioli, combine first 3 ingredients in a small bowl; set aside.

  • To prepare cakes, combine salmon and next 5 ingredients (through mustard) in a medium bowl. Divide salmon mixture into 4 equal portions, shaping each portion into a patty. Dredge patties in 1/2 cup breadcrumbs.

  • Heat oil in a large skillet over medium-high heat. Place patties in pan; cook 3 minutes on each side or until lightly browned and heated through. Serve with aioli and mixed greens.

-Adapted from myrecipes.com


    I’ll definitely make this again-the taste, and the price, can’t be beat.

    Saturday, July 23, 2011

    On a Stick: Simple Summer Grilling


    Kabobs are magical. I think food on a stick appeals to the kid in all of us. For me it brings back memories of corn dogs, popsicles, and the amazing chicken satays sold by virtually every street vendor in NYC-that I lived on for an entire week during my “Atkins phase” back in 2002.


    Also magical, I realized that my stepkids would eat peppers the first time I made kabobs. I had skewered chicken, red bell peppers and onions and basted them with teriyaki sauce, grilled them and served them up. I was surprised to see even the youngest cleaned his plate. This opened up a whole new world of recipes I would soon make them, most including those peppers and onions. It’s such a simple concept yet always impresses.


    After varying my methods for many years, I’ve finally settled on a few key ideas that make the whole thing work:


    1-Use metal skewers. Every time I used the wooden skewers, no matter how long I soaked them in water, they burnt up on the grill.


    2-Keep the pieces of meat and veggies uniform in size. This helps the skewered food cook evenly.


    3-Brush on a sweet-based sauce at the end, and savor the blackened bits. It’s so worth it. Cubed meat and veggies provide more cooking area, thus more yummy, crispy edges.


    And that’s about it. To make, simply cut the meat and veggies into uniform chunks, thread the meat and veggies alternately through the skewers, and grill as desired.


    Here are a few of my favorite items to include:


    Choose a meat (or two or three!)


    Chicken Breasts


    Sirloin Steak


    Italian Sausage


    Ahi Tuna


    Shrimp


    Add any of the following veggies:


    Green, Red, Orange or Yellow Bell Peppers


    Onions


    Cherry Tomatoes


    Zucchini


    And baste the sauce on at the end:


    Teriyaki


    Jack’s Chipotle Grilling Sauce


    Sweet Baby Ray’s BBQ Sauce


    The best thing about eating kabobs is that it’s a self-contained meal- no sides required. I’ve also found that the leftovers make great tacos, so make extra and grill once, eat twice!

    Sunday, July 3, 2011

    Recipe of the Day: Grilled Chicken Bruschetta


    Tomato, basil, onion & garlic make me incredibly happy. As in, I took a hundred pictures of them happy. Throw in some amazing cheese, a loaf of crusty bread and balsamic vinegar, and I could eat for a week.


    Eventually, we’ll have all of these fresh from the garden, but I haven’t been exactly patient this year…right now I’m anxiously awaiting having fresh tomatoes on our vines. In the meantime, we have so much basil in the herb garden that I’m always looking for ways to use it. This recipe is inspired by one of my favorite appetizers-traditional Italian bruschetta, usually served on crostini. 


    Ingredients:


    For the bruschetta:


    2.5 cups chopped tomatoes


    1/2 cup fresh basil, chopped


    3/4 cup chopped onion


    2 tbsp minced garlic


    2 tbsp Girard’s Italian Dressing


    1/2 tsp olive oil


    1/2 tsp salt


    1/2 tsp black pepper


    1/2 tsp Italian Seasoning


    For the chicken:


    4 boneless, skinless chicken breasts


    3 tbsp balsamic vinegar


    3 tbsp lemon juice


    2 tbsp olive oil


    2 tbsp Dijon Mustard


    1 tsp chopped fresh parsley


    1/2 tsp garlic powder


    1/2 tsp salt


    1/2 tsp black pepper


    Directions:


    Prepare the chicken breasts by making 1/4 inch deep cross-hatch slices on both sides of the chicken (or on one side if the chicken is thinner).


    Combine balsamic vinegar and next seven ingredients in a mixing bowl. Place the chicken breasts and balsamic vinegar marinade mixture in a gallon ziploc bag, and refrigerate for up to one hour.


    To cook the chicken, first preheat the grill. Remove the chicken from the bag and discard the marinade. Coat the grill rack with cooking spray, and place chicken on the grill. Grill six minutes on each side or until chicken is done.


    To make the bruschetta, pour 2 tbsp Girard’s Italian Dressing and 1/2 tbsp olive oil into a shallow pan and turn heat to medium-high. Add the onions and cook for 1 minute. Add the tomatoes, basil, garlic, salt, pepper and Italian Seasoning. Cook for 2 minutes or until the bruschetta mixture is hot but the tomatoes are still firm.


    Top the grilled chicken with the bruschetta and enjoy.


    Bonus Points: Top the chicken and bruschetta with slices of buffalo mozzarella!

    Friday, July 1, 2011

    Recipe of the Day: Shrimp Boil


    Dustin, my older stepson, turned 19 yesterday, and his favorite food is shrimp. For a few months I tried to think of a unique way to have a birthday party featuring shrimp, and came up with a shrimp boil. I think it was probably my family’s favorite dinner yet, and we’ll definitely be doing this again.


    The recipe is simple and can be tweaked to your taste. I’ve adapted this recipe to feed 10 people, but it would be easy to scale up for a party or down for a weeknight meal.


    Ingredients:


    4 packets of shrimp boil seasoning


    2 tbsp Old Bay seasoning


    10 medium red potatoes, cut into quarters


    2.5 large vidalia onions, cut into quarters


    3 lb smoked sausage, cut into two inch lengths


    16 small ears frozen corn on the cob (do not thaw)


    4 lb frozen white shrimp in shells (do not thaw)


    Directions:


    Fill a 16 quart stock pot with about 10 quarts of water. Add the four packets of shrimp boil seasoning and 2 tbsp Old Bay seasoning and bring to a boil. Add potatoes and onions, cook on high for 8 minutes.


    Add smoked sausage, continue boiling for 5 minutes.


    Add corn, continue to boil for 8 minutes.


    Add shrimp, continue boiling for 4 minutes.


    When complete, drain cooking liquid and serve the shrimp boil in pails or large serving dishes. I served this with a variety of hot sauces, butter for the corn and potatoes, and cocktail sauce for the shrimp. Enjoy!

    Tuesday, June 28, 2011


    July: A month of basil!


    A great list of 31 ideas for Basil from Food Network Magazine. Click on the image for the hi resolution version of the pic. Enjoy!

    Monday, June 13, 2011

    Ingredient of the Day: Mesclun Greens


    Summer is finally here! 


    About five weeks ago, while it was still very chilly and rainy, I planted mesclun seeds in our garden. It was probably the easiest and cheapest gardening I have ever done-and we ate the results last night for dinner! I purchased the packet of seeds at Lowe’s for only $1.


    Mesclun is a mix of young salad greens, typically including arugula, leaf lettuce, frisee, endive, mizuma, oak leaf, lamb’s lettuce, radicchio, chervil, groundsel, sorrel and dandelion. Yummy, nutritious mesclun greens are easy to grow in the spring and yield 3-4 harvests in early summer. Simply sow seeds into well-worked soil by placing seeds in hand, then shaking side to side to allow seeds to fall into the soil, and cover with loose soil or potting mix. Gently water the seeds as necessary (keeping the soil moist, but not soggy) until the seeds begin to sprout. 


    When leaves are 3-4” tall, you are ready to harvest. Snip leaves to a height of 1-2” to allow mesclun to re-grow for another harvest. 


    Mesclun salads are among my favorites, for the mix of lettuces and greens provides a different texture and taste in each bite. Last night, I made an Italian-style salad with onion and tomato slices, pepperoni and mozzarella cheese, topped with my favorite dressing, Girard’s Italian.


    Mesclun is also a wonderful accompaniment to crab cakes, bacon-wrapped scallops and any other appetizer-style dish that uses an aioli dipping sauce. The dipping sauce and especially the seafood flavor provides a sweet, creamy balance to the crunchy greens. 


    Happy Gardening-and Welcome to Summer!

    Wednesday, February 27, 2008

    Mexican Shrimp "Cocktail"


    I am so looking forward to spring and summer that I thought I would share one of my yummy and healthy Mexican dishes. This dish is served quite often in Mexico and the Southwest, and of course I've adapted this to make it my own.

    I like to serve this in individual martini glasses. Also, instead of eating with a spoon, I prefer to use tortilla chips (I like Tostitos Scoops) to scoop out the cocktail. I then usually add a few drops of Tapatio hot sauce to the chip for a spicy kick.

    2 pounds small or medium cooked shrimp, peeled and deveined
    1 large can of stewed tomatoes
    water, as needed
    2 Roma Tomatoes, chopped
    1/2 large white or yellow onion, chopped
    1 bunch green onions, chopped
    1 cucumber, chopped
    salt, pepper and garlic to taste
    lime juice to taste

    Place tomatoes, onions, and cucumber in a large bowl. Cut shrimp into bite-sized pieces and mix into tomato, onion and cucumber mixture. Open can of stewed tomatoes, and using the lid, drain only the sauce (not the stewed tomatoes) into the mixture. Add about 1/4 cup of water until mixture is just covered with sauce. Season with salt, pepper and garlic to taste. Stir in about a tablespoon of lime juice to taste. Cover, and refrigerate 2 to 3 hours. Serve in one large bowl or ladle into individual bowls.

    Mexican Shrimp "Cocktail"


    I am so looking forward to spring and summer that I thought I would share one of my yummy and healthy Mexican dishes. This dish is served quite often in Mexico and the Southwest, and of course I’ve adapted this to make it my own.

    I like to serve this in individual martini glasses. Also, instead of eating with a spoon, I prefer to use tortilla chips (I like Tostitos Scoops) to scoop out the cocktail. I then usually add a few drops of Tapatio hot sauce to the chip for a spicy kick.

    2 pounds small or medium cooked shrimp, peeled and deveined
    1 large can of stewed tomatoes
    water, as needed
    2 Roma Tomatoes, chopped
    1/2 large white or yellow onion, chopped
    1 bunch green onions, chopped
    1 cucumber, chopped
    salt, pepper and garlic to taste
    lime juice to taste

    Place tomatoes, onions, and cucumber in a large bowl. Cut shrimp into bite-sized pieces and mix into tomato, onion and cucumber mixture. Open can of stewed tomatoes, and using the lid, drain only the sauce (not the stewed tomatoes) into the mixture. Add about 1/4 cup of water until mixture is just covered with sauce. Season with salt, pepper and garlic to taste. Stir in about a tablespoon of lime juice to taste. Cover, and refrigerate 2 to 3 hours. Serve in one large bowl or ladle into individual bowls.

    Monday, February 11, 2008

    7 foods every woman must eat

    Everyone gets busy with work and family, so I thought I would post a great resource for busy girls...


    http://food.yahoo.com/blog/beautyeats/19173/7-foods-every-woman-must-eat

    7 foods every woman must eat

    Everyone gets busy with work and family, so I thought I would post a great resource for busy girls…


    http://food.yahoo.com/blog/beautyeats/19173/7-foods-every-woman-must-eat

    Wednesday, November 7, 2007

    Japanese Table Etiquette


    I'm back on the sushi kick. Lately I've been in the mood to go out and eat chef's choice at a most out-of-the-way sushi joint.
    Tthis of course requires some travel on my part-but due to a busy competition cheerleading season I've been lucky to get out of town most weekends.

    I've introduced Rick to sushi several times over the course of the past few months with no luck. But the introduction to sushi restaurants made me want to go back and polish up on my Japanese table etiquette.

    This is adapted from an article by June Chua:

    What to Wear: Most diners are casually dressed, whether going to a cheap or expensive place. Look nice and presentable.

    The Shoe Issue: Restaurants that have tatami rooms will ask you to remove your shoes before entering. When heading to the washroom, you are expected to use special bathroom slippers. LEAVE THE SLIPPERS IN THE BATHROOM and do not wear them upon your return.

    Ordering: The best thing is to ask for the chef's choice (omakase), which is how most people eat.

    How To Eat: Sometimes, a meal comes that has several "pieces" and you may not be sure exactly how it's to be eaten. Feel free to ask the wait staff whether you should combine or stir things. Drink the miso soup as if it was in a cup and pick out the big pieces with your chopstick. It is customary to finish your meal down to the last grain of rice. Do not burp.

    Table Talk: You must refrain from unpleasant conversation - anything that would approach issues of the toilet or anything unappetizing. Oh yes, never blow your nose at the table.

    Sushi: You can use fingers or chopsticks. If the sushi is meant to be dipped in sauce, only dip the fish part – not the rice. Eat the sushi in one bite. You can even ask the chef to cut pieces in half if they seem too large. By the way, you should not be adding wasabi to your soy sauce. If eating gunkan sushi (think of roe bits nestled in a seaweed cup), you should pour the soy over it.

    Sake and Beer: Never pour your own, it's the responsibility of your companions and naturally, you must do the same for them. Do not start drinking until everyone is served. A drinking salute is usually "kampai."

    The Finish: You'll be given a towel. Wipe your hands ONLY, fold it neatly and place to the side. Use it to dab your fingers during the meal.

    Tipping: Service is included on the bill.

    Words to Remember: "Oishii" (delicious) or better, "gochisosama (deshita)" (Thank you for the meal).

    Japanese Table Etiquette


    I’m back on the sushi kick. Lately I’ve been in the mood to go out and eat chef’s choice at a most out-of-the-way sushi joint.
    Tthis of course requires some travel on my part-but due to a busy competition cheerleading season I’ve been lucky to get out of town most weekends.

    I’ve introduced Rick to sushi several times over the course of the past few months with no luck. But the introduction to sushi restaurants made me want to go back and polish up on my Japanese table etiquette.

    This is adapted from an article by June Chua:

    What to Wear: Most diners are casually dressed, whether going to a cheap or expensive place. Look nice and presentable.

    The Shoe Issue: Restaurants that have tatami rooms will ask you to remove your shoes before entering. When heading to the washroom, you are expected to use special bathroom slippers. LEAVE THE SLIPPERS IN THE BATHROOM and do not wear them upon your return.

    Ordering: The best thing is to ask for the chef’s choice (omakase), which is how most people eat.

    How To Eat: Sometimes, a meal comes that has several “pieces” and you may not be sure exactly how it’s to be eaten. Feel free to ask the wait staff whether you should combine or stir things. Drink the miso soup as if it was in a cup and pick out the big pieces with your chopstick. It is customary to finish your meal down to the last grain of rice. Do not burp.

    Table Talk: You must refrain from unpleasant conversation - anything that would approach issues of the toilet or anything unappetizing. Oh yes, never blow your nose at the table.

    Sushi: You can use fingers or chopsticks. If the sushi is meant to be dipped in sauce, only dip the fish part – not the rice. Eat the sushi in one bite. You can even ask the chef to cut pieces in half if they seem too large. By the way, you should not be adding wasabi to your soy sauce. If eating gunkan sushi (think of roe bits nestled in a seaweed cup), you should pour the soy over it.

    Sake and Beer: Never pour your own, it’s the responsibility of your companions and naturally, you must do the same for them. Do not start drinking until everyone is served. A drinking salute is usually “kampai.”

    The Finish: You’ll be given a towel. Wipe your hands ONLY, fold it neatly and place to the side. Use it to dab your fingers during the meal.

    Tipping: Service is included on the bill.

    Words to Remember: “Oishii” (delicious) or better, “gochisosama (deshita)” (Thank you for the meal).

    Tuesday, October 9, 2007

    Basilicious


    Each year I end up with copious amounts of the fragrant herb at the end of the season. While I enjoy bruschetta weekly during the summer, what's a girl to do with all that basil? When life hands you basil, make pesto!

    I've found that Ball Freezer Jars work perfectly to preserve the basil pesto all winter. It's wonderful to be able to visit the freezer for a taste of the summery spread in a calzone or on a sandwich.


    My favorite basil pesto recipe is from Michael Chiarello of NapaStyle fame. I have altered the recipe slightly as freezing the nuts and cheese does not work particularly well.


    (Makes about 3/4 cup, enough for 1 pound pasta.)
    2 cups firmly packed fresh basil leaves
    1/3 cup olive oil
    1/2 teaspoon minced garlic
    Sea salt, preferably Gray salt
    Freshly ground black pepper
    Pinch of powdered ascorbic acid (vitamin C)

    Prepare an ice water bath in a large bowl, and bring a large pot of water to a boil. Put the basil in a large sieve and plunge it into the boiling water. Immediately immerse all the basil and stir so that it blanches evenly. Blanch for about 15 seconds. Remove, shake off the excess water, then plunge the basil into the ice water bath and stir again so it cools as fast as possible. Drain well.
    Squeeze the water out of the basil with your hands until very dry. Roughly chop the basil and put in a blender. Add the garlic, salt and pepper to taste, olive oil and the vitamin C, if using. Blend for at least 30 seconds. In this way the green of the basil will thoroughly color the oil. Pulse to combine.

    Michael's Notes: Don't try to make this pesto in a food processor. The processor just throws it around the bowl. A blender does a much better job.

    Japanese Bento Boxes


    A bento box is designed to hold lunch for one, with individual compartments and sometimes multiple tiers for rice or noodles and several side dishes.
    Bento is an art form in Japan. Japanese women spend a good part of their mornings preparing bento for their families – there is even a sense of competition among mothers to see who can produce the most cute, appetizing, and healthy lunch for their children. Modern Japanese culture virtually revolves around compact cuteness. The variety of designer bento boxes, food liners, wiener and cookie cutters, egg molds, food picks, and other bento-ware used to create these mini-masterpieces is amazing and overwhelming.


    Shop for Bento supplies at:

    http://stores.ebay.com/The-Bento-Store

    Japanese Bento Boxes


    A bento box is designed to hold lunch for one, with individual compartments and sometimes multiple tiers for rice or noodles and several side dishes.
    Bento is an art form in Japan. Japanese women spend a good part of their mornings preparing bento for their families – there is even a sense of competition among mothers to see who can produce the most cute, appetizing, and healthy lunch for their children. Modern Japanese culture virtually revolves around compact cuteness. The variety of designer bento boxes, food liners, wiener and cookie cutters, egg molds, food picks, and other bento-ware used to create these mini-masterpieces is amazing and overwhelming.


    Shop for Bento supplies at:

    http://stores.ebay.com/The-Bento-Store

    Sunday, October 7, 2007

    Deceptively Delicious


    As a mother of three, Jessica Seinfeld can speak for all parents who struggle to feed their kids right and deal nightly with dinnertime fiascos. As she wages a personal war against sugars, packaged foods, and other nutritional saboteurs, she offers appetizing alternatives for parents who find themselves succumbing to the fastest and easiest (and least healthy) choices available to them. Her modus operandi? Her book is filled with traditional recipes that kids love, except they're stealthily packed with veggies hidden in them so kids don't even know!